Set up your camera in the
avisec Cloud Cockpit
This guide walks you through the step-by-step setup of a Construction Camera. Each image is transferred to the avisec Cloud Cockpit automatically. Before starting, please make sure your camera supports FTP uploads.
Our team is happy to assist you with the configuration if you encounter an issue.
Content Table

How to set up a Construction Camera
Setting up a construction camera takes just a few minutes. The avisec services work with any IP camera that can upload images via FTP or FTPS. You’re already using a camera from Axis, Milesight, or Hikvision? No problem, the avisec Cloud Cockpit also supports cameras not supplied by avisec.
1. Login
Log in to the avisec portal using your Superuser or Admin account.
If you don’t have an account yet, please contact us.

2. Add a new construction camera
Go to “List of Cameras” and click the “Create” button.

3. Enter project and camera location details
In this section, enter all information about the exact camera location and project title.
Project Title: Any project name of your choice. You can also show this title in the feed.
Camera Status: Select “Operating” if the camera will be active immediately, otherwise choose “Staged.”
Owner*: For partners managing multiple accounts. Important: Select the correct billing contact and administrator here.
Location: Enter the exact location of the construction camera.
Latitude / Longitude: Enter the camera coordinates manually or by clicking on the map. You can also use Google Maps to find the precise coordinates.

4. Enter feed options and tags
5. Camera Options
How to create users for your Camera
You can assign an individual account for each user. A user can have access to one or multiple construction cameras, depending on your project setup and permission settings.
1. Create Users
Go to the “Users” menu and click “Create User.”

2. Define Username and Password
Create a unique username and password for the user. An email address is mandatory, as it’s also used for features such as bulk downloads. Each person should have their own individual account.
Permissions: Define user rights
Select the corresponding camera from the menu. One or multiple cameras can be assigned to a user.
Choose Tables:
Select the image tables the user should have access to. At least one table must be defined. If a user should not see all image tables, restrictions can be set here.
Level: Defines access rights
| Function | User Level „User“ | User Level „Guest“ |
| View images | Yes | Yes |
| View camera and settings | Yes | No |
| Download | Yes | No |
| View feeds | Yes | Yes |

How to configure Construction Camera Feeds
A Feed represents the publication of an image table. If you don’t want to allow public access and the images are only meant to be stored internally, you can skip this step. In this case, your configuration is complete.
A feed can be viewed without a password. As soon as the token is known, the construction camera feed can be accessed.
Configure a Feed
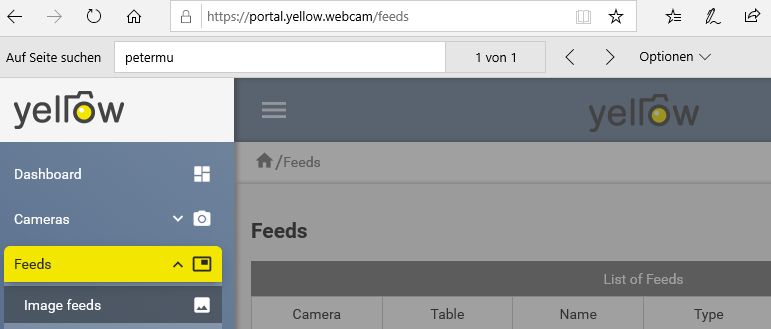
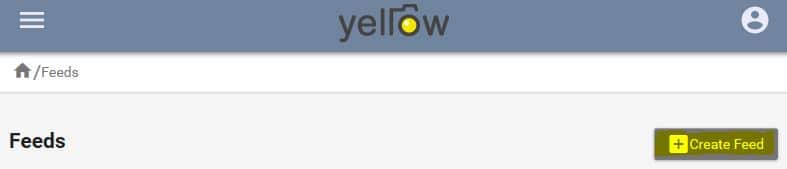
Go to “Feeds → Image Feed” and click “Create Feed.”
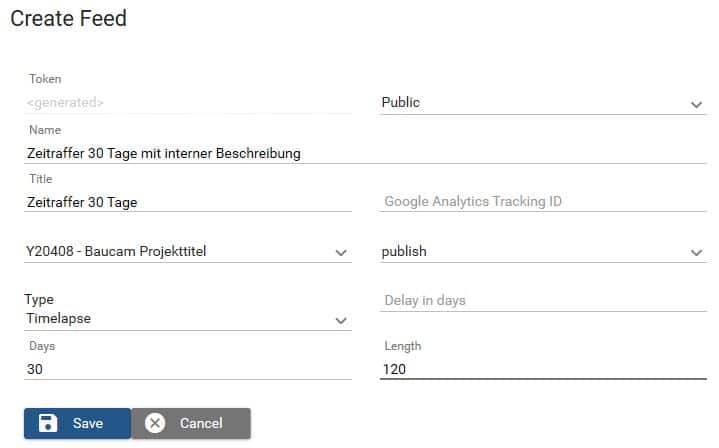
Token: Assigned automatically by the avisec Cloud Cockpit and remains valid until deleted.
Visibility:
-
Public: Visible to everyone, avisec customers can also see the Feed on our map of cameras in the Cloud Cockpit.
-
Web Open: Publicly visible with a preview image on the map in the avisec Cloud Cockpit.
-
Private: Restricted access, not publicly visible.
Name: Internal feed name (only visible in the portal).
Title: Public feed title (displayed with the feed). Leave blank if you want to use the camera title instead.
Select camera: Choose the camera you want to publish from.
Select table: Choose the image table for publication.
Type: Select the type of publication.
Need help setting up your camera or feed?
Our experts are happy to assist you, whether it’s connecting a new camera, configuring feeds, or troubleshooting uploads.
Get in touch and we’ll make sure your setup runs smoothly from the start.